Programming the Version 1 TK-481
The Version 1 TK-481 has long been shied away from for ham use because it requires KPG-35D or KPG-35DHam to be run in a pure DOS environment to program the radio. This pure DOS environment is no longer necessary since the advent of DOSBox. DOSBox is a program that allows DOS programs to be run in a Windows environment, yes, this works just fine for programming the Version 1 TK-481 using KPG-35D or KPG-35DHam and the awesome part is you can use a USB cable to program this radio!
I first discovered DOSBox when corresponding with Pete, N2MCI, as he had mentioned that he was tinkering with DOSBox and asked if I had ever used it to program a Version 1 TK-481 handheld. That email got me downloading DOSBox and sure enough that program is the "cat's meow" for programming the 431/481V1/941 as it works great!
I will go through step by step on how to set up KPG-35D and DOSBox for programming a Version 1, TK-481. The setup will take a little trial and error, but will work beautifully once properly configured in less than 15 minutes! There are two parts of the DOSBox setup process; getting your program cable configured and from there getting KPG-35D configured.
PLEASE NOTE
If your USB to serial adapter or USB program cable uses the FTDI chipset then DOSBox will NOT work with your adapter! The FTDI chipset uses a protocol of 5 data bits whereas the Prolific based chipset adapter use the more common 8 data bits. This protocol difference means that when DOSBox starts up and tries to open the COM port that you specify in the DOSBox Config file it will open this port using a protocol of "9600, 8, n, 1" and since the FTDI chipset uses "9600, 5, n, 1" DOSBox will not be able to open the COM port. When trying to use the FTDI chipset with DOSBox you will get the following error: "Serial1: Desired serial mode not supported (9600,5,n,1)". Before proceeding with the steps below make sure that you are NOT using a FTDI based chipset USB serial adapter or USB programming cable!
Initial USB/Serial Programming or USB Adapter Cable Setup Using DOSBox
- Download and install DOSBox from here www.dosbox.com
- First and foremost; if you are going to be using a real serial port DB-9 programming cable connected to the serial port on your computer then you can skip this step and go to step 6. If you are going to use a USB to serial port adapter or USB programming cable then install the drivers for your USB to serial adapter or program cable using the CD that was supplied with it.
- Plug your USB program cable or USB to serial port adapter into the USB port on your computer.
- We now need to check and see that the USB port and driver for our port functions and shows up in Windows Device manager. Go to "Control Panel" in Windows, from there "System", from there "Device Manager" and then click on "Ports (COM & LPT)" and expand down so that your USB Program cable or USB to serial adapter shows up.

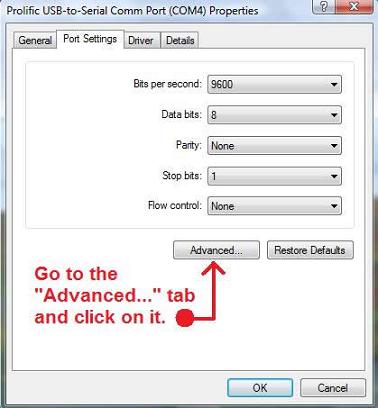
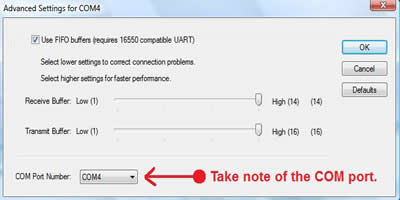
- Double-click on your USB adapter and a window will pop up, from there click on the "Port Settings" tab and then click on "Advanced...", make sure that you take note of the COM port number that your USB program cable or USB to serial port adapter is plugged into, this will be used to tell DOSBox where to look to find your program cable or adapter. Click “OK” and exit out of Device Manager.
- In the Windows Start menu go to the DOSBox tab, then "Options", from there select "DOSBox 0.74 Options."

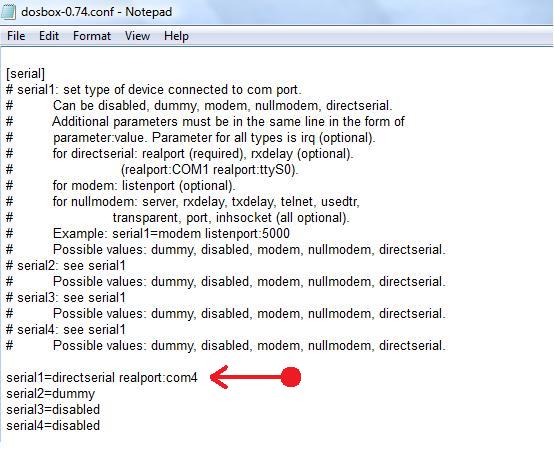
- Notepad will open and display "dosbox-0.74.conf"; this is the configuration file for the DOSBox program.
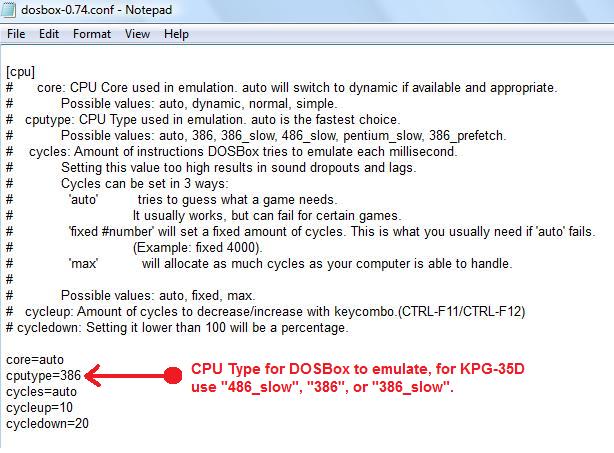
- Now that the DOSBox configuration file is open we need to tell it to run KPG-35D in a slower processor environment. DOSBox will emulate a slower speed processor so that KPG-35D will feel like it's running on an old slow computer. This may or may not be necessary as by default the processor speed is set to "auto" but if KPG-35D has issues running on that setting then try running it as "486_slow", "386", or "386_slow".
- We also want to redirect the setting of Serial port 1 in our DOS program (KPG-35D) to our serial program cable, USB program cable, or USB to serial port adapter- this was the COM port number that we noted earlier in step 5. Scroll down towards the bottom of "dosbox-0.74.conf" and find where it reads "serial1=disabled" or "serial1=dummy" etc... we will need to change it to direct serial 1 to the serial program Cable, USB program cable, or USB to serial port adapter. Change the text to read "serial1=directserial realport:comx" where "x" is the COM port number where your serial program cable, USB program cable, or USB to serial port adapter is plugged in (the number that we took note of in step 5). Pictured below I have "serial1" set to COM4, your COM port number will most likely be different from the one pictured below.
- We are finished with setting up our serial program cable, USB program cable, or USB to serial port adapter in DOSBox, before closing the window we must save our settings. With the dosbox-0.74.conf file open go to "File" and then click "Save". You can now exit out of our DOSBox window.
- In future programming endeavors make sure you use the same physical serial or USB port on your computer otherwise you will have to go back to step 9 and tell DOSBox where to look to find the serial program cable, USB program cable, or USB to serial port adapter.
Initial KPG-35D Programming Software Setup Using DOSBox
There are essentially two basic methods to using DOSBox for running KPG-35D or any other DOS based programs. I will go through each method in detail so that you can choose the method you prefer.
DOSBox Method 1
Method 1 requires telling DOSBox every time you run it what program you would like it to run, it will use the configuration file for COM port settings and processor speed that we setup previously as its default. Method 1 has its disadvantages in that you have to remember the path to your exe file, and the correct language to get it to start, but the advantage of it is you can run other DOS based programs (other than KPG-35D) and merely type the directory and name of the program you want DOSBox to run.
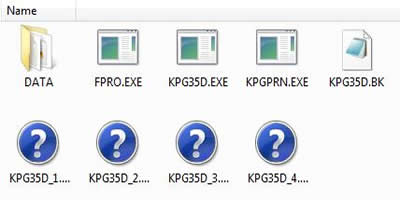
- The first step to setting up DOSBox to work with KPG-35D is to have KPG-35D on your hard drive in a simple and easy location. Create a folder named "kpg35d". Inside that folder should be "kpg35d.exe", "kpg35d.bk", and a few other files along with a folder named "data". Do not have KPG-35D located in folders within folders (multiple levels), do not use hyphens in the folder names or in the file names, keep things super simple- once you get the hang of what is going on- then you can adjust things as you want.

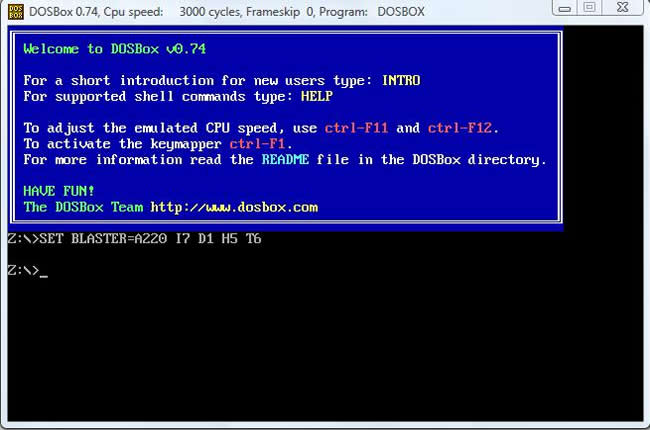
- From the Windows “Start” menu go to the DOSBox folder and run DOSBox, you will see a command prompt "Z:\>" at this point we need to tell DOSBox where the "kpg35d" folder is located. We are going to be assuming that you placed the folder "kpg35d" on your "C:" drive, if you have a different drive letter then that's fine- just make sure to use the correct one in the steps below.
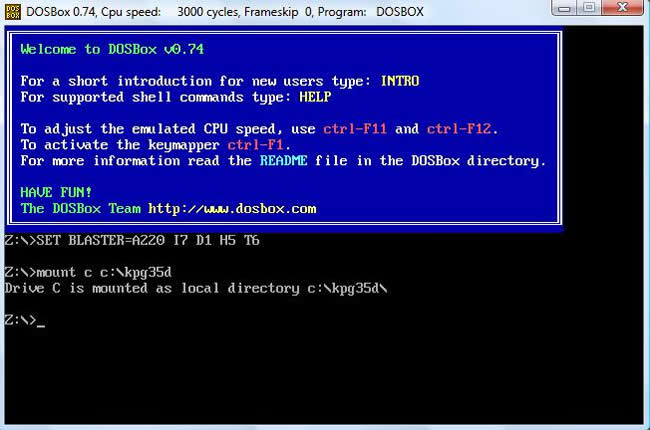
- Type "mount c c:\kpg35d" it is important that you have the folder where "kpg35d.exe" typed correctly in this step- otherwise DOSBox will not be able to locate it. You will then get a reply from DOSBox that "Drive C is mounted as local directory c:\kpg35d\".
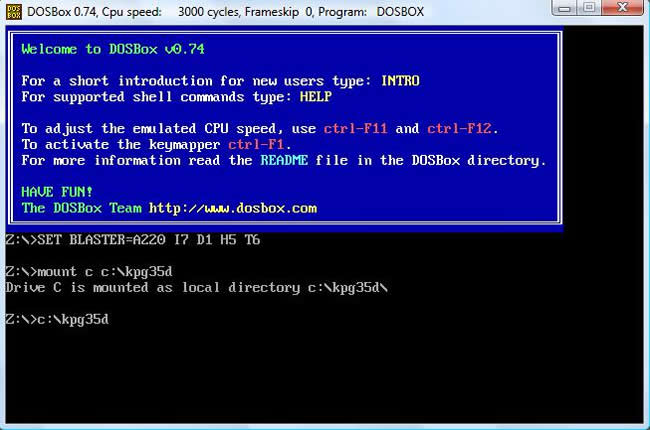
- You will then get a prompt "Z:\>" at this step we are ready to run "kpg35d.exe", so type "c:\kpg35d" which is the name of the executable file in our folder without the ".exe" on the end!
- The program will run and you will now be able to open or create a .DAT file for your version 1 TK-481!

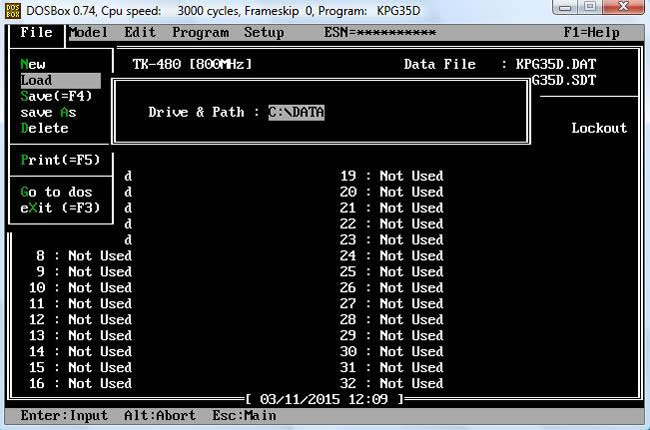
- If you want to open a DAT file you have previously created in KPG-35D simply go to the "File" menu in KPG-35D and select "Load". If you want to save a DAT file you have created in KPG-35D then go to the "File" menu and select "save As". When you go to the "File" menu to either "Load" or "save As" a DAT file you will get a pop up box, from there you need to specify the drive letter and path so that KPG-35D knows where to look; specify the drive and path as "C:\DATA".

DOSBox Method 2
Method 2 makes running DOSBox a little more automated and only requires initial setup of the configuration file and then its merely a matter of clicking on the DOSBox shortcut in your Windows "Start" menu and KPG-35D runs itself. The advantage of this is that DOSBox runs KPG-35D automatically; no typing or commands are necessary. Method 2 works great if you are only interested in running KPG-35D on your computer and no other DOS based programming software using DOSBox.
- The first step to setting up DOSBox to work with KPG-35D is to have KPG-35D on your hard drive in a simple and easy location. Create a folder named "kpg35d". Inside that folder should be "kpg35d.exe", "kpg35d.bk", and a few other files along with a folder named "data". Do not have KPG-35D located in folders within folders (multiple levels), do not use hyphens in the folder names or in the file names, keep things super simple- once you get the hang of what is going on- then you can adjust things as you want.
- In the Windows Start menu go to the DOSBox tab, then "Options", from there select "DOSBox 0.74 Options."

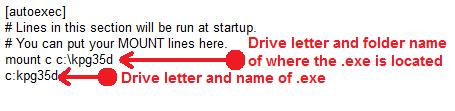
- Our next step is to make the execution of KPG-35D a little more streamlined by telling DOSBox beforehand that it will be running "kpg35d.exe" and exactly where "kpg35d.exe" can be found. If we scroll all the way to the bottom of our "dosbox-0.74.conf" file you will see a line at the bottom that states "#You can put your MOUNT lines here." Underneath this line I have added "mount c c:\kpg35d" this will tell DOSBox what folder to look in when the next time DOSBox is run. Underneath the folder location we just added you need to tell DOSBox that it needs to run the executable for KPG-35D so we add the line "c:kpg35d". After we have added these lines and before closing this window we must save our settings. With the dosbox-0.74.conf file open go to "File" and then click "Save". You can now exit out of our DOSBox window.
- Go to the Windows “Start” menu and open the DOSBox folder and run DOSBox. DOSBox will run and the program will run KPG-35D automatically! You will now be able to open or create a .DAT file for your version 1 TK-481!

- If you want to open a DAT file you have previously created in KPG-35D simply go to the "File" menu in KPG-35D and select "Load". If you want to save a DAT file you have created in KPG-35D then go to the "File" menu and select "save As". When you go to the "File" menu to either "Load" or "save As" a DAT file you will get a pop up box, from there you need to specify the drive letter and path so that KPG-35D knows where to look; specify the drive and path as "C:\DATA".